Rack Diagram Complete Guide
Ready to Create Your Rack Diagram?
EdrawMax is the premier diagramming and visualization software. This comprehensive guide covers everything you need to know about rack diagrams. Start for free now!
When purchasing equipment for a data center, a rack diagram is an essential tool. It helps you determine which items to buy and how to organize them efficiently. You may be familiar with the term "rack server," often used by IT professionals. Also known as a rack-mount computer or server rack, these are the workhorses of the IT industry, storing and protecting critical data processing resources. They are most commonly found in data centers but are also used by commercial and small computer companies.
Proper organization of a rack server is crucial. It helps prevent problems, simplifies maintenance, saves valuable time when troubleshooting, and reduces costs. The best way to ensure this is by using a rack diagram. In this article, we'll cover everything you need to know, including what a rack diagram is, its key components, and how you can easily create one using EdrawMax.

1. What is a Rack Diagram?
A rack diagram is a graphical representation of an organization's rack system. It's a key tool used by software developers and IT designers to document and plan network equipment. By providing a clear illustration of a rack's layout, it helps with planning, reduces errors, saves space, and prevents unnecessary equipment purchases.
Keep in mind, these aren't just any racks; they're specifically designed to organize and hold servers and other information technology equipment. Creating a rack diagram helps you plan and document your server rack, making it easier to handle changes, like adding new equipment.
A rack diagram is a visual representation of a rack system commonly used by data centers. Creating a server rack diagram is a crucial step for organizing your rack equipment effectively.
1.1 Components of a Server Rack
A server rack includes components such as patch panels, blanking panels, routers, switches, cords and cables, rails, and cable management bars. Understanding these essential parts of a server rack's design helps you more easily identify the features you need and choose the best server for your business.
1.2 What is a Server Rack Used For?
Rack servers enable your IT department to organize, secure, and preserve your data processing infrastructure. By placing your system components in a rack console, you create a robust and manageable connection for your business. Most businesses have hundreds, if not thousands, of rack servers, all connected to the same company network and working to keep information processes running smoothly.
Most rack servers are stationary and made of metal. However, some, like those used at military sites, are designed to be transportable for field operations. They often feature protective transport cases, dust-proof coverings, mobile cooling equipment, and rubberized cushions that allow them to maintain their server platforms while on the move.
2. Preparing to Create a Rack Diagram
2.1 Tips for Organizing Your Server Rack
Proper rack organization begins with selecting the right size of racks and cabinets. The most common type is the 19-inch-wide network rack, but a wide range of depths and heights are available. Ensure your racks are tall enough to accommodate adequate power, cooling, and space.
High-performance network servers require racks that are deep enough to accommodate their components and ensure proper airflow and easy access.
Determine which items should be housed in the rack. You can organize them by multiple small workloads, larger workloads, or by the type of workload.
Identify where each component should be installed. For example, heavier equipment is typically placed at the bottom, with lighter components above. A rack diagram is essential for organizing items correctly and avoiding the hassle of moving components later.
Ensure proper cooling. Some equipment consumes a lot of power, which generates significant heat. Make sure there is enough space between items and consider an in-rack cooling system to guarantee adequate cooling.
Plan proper cable management: Keep cords neat to avoid twisting or bending. Also, separate network cables and power cords to prevent electromagnetic interference.
2.2 Drawing Guidelines
Creating a rack diagram can help you determine the correct size of the rack that fits your budget and decide on the best setup. To do it right, consider the following tips before you begin your diagram.
Step #1: List All Your Rack Items
Drawing a rack diagram without first listing all its items can create problems, such as not having enough space for equipment, patch panels, or cables. Before you start drawing, list all the rack components you have and any you plan to purchase in the future. This will ensure you have the best layout for all your rack items. Identify their shapes, the number of racks you'll need, and other special items like cables and raceways. Be sure to note the measurements of each item.
Step #2: Know Your Rack's Size
Another important tip is to know the size of your rack. If you're planning to purchase one, check the available space you have. It's only after you've determined the rack size that you can draw an effective diagram. A networking rack typically uses a standardized hole spacing known as a rack-mount unit (RMU). If you're drawing the server rack by hand, you'll need to know the size and convert it to RMU. However, this process is much faster and more accurate when you use EdrawMax.
Step #3: Review Your Network Design
Review your network design before drawing the rack illustration. This will help you better organize your rack. Make sure to determine where to place both software and hardware components in the server rack diagram. By preparing thoroughly, you can create a well-organized rack diagram. Once you've checked these tips, you're ready to move to the next step.
3. How to Draw a Rack Diagram in EdrawMax
As you've seen, creating a rack diagram can be time-consuming and difficult, especially if you're drawing it by hand. You'd need to perform many calculations and draw each item to scale, which can lead to expensive errors and organizing problems. That's where EdrawMax comes in.
EdrawMax is fully equipped to help you design a rack diagram with just a few simple steps:
Step 1 Open EdrawMax and Log In
The first step is to install EdrawMax on your system. Go to EdrawMax Download and get the software for your operating system. If you need to collaborate with your team remotely, head to EdrawMax Online and log in with your registered email address.
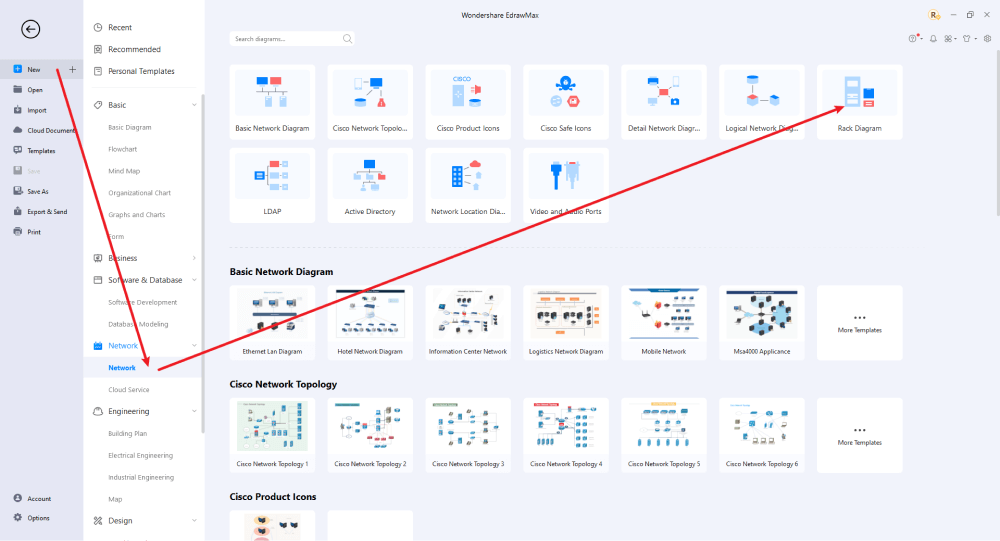
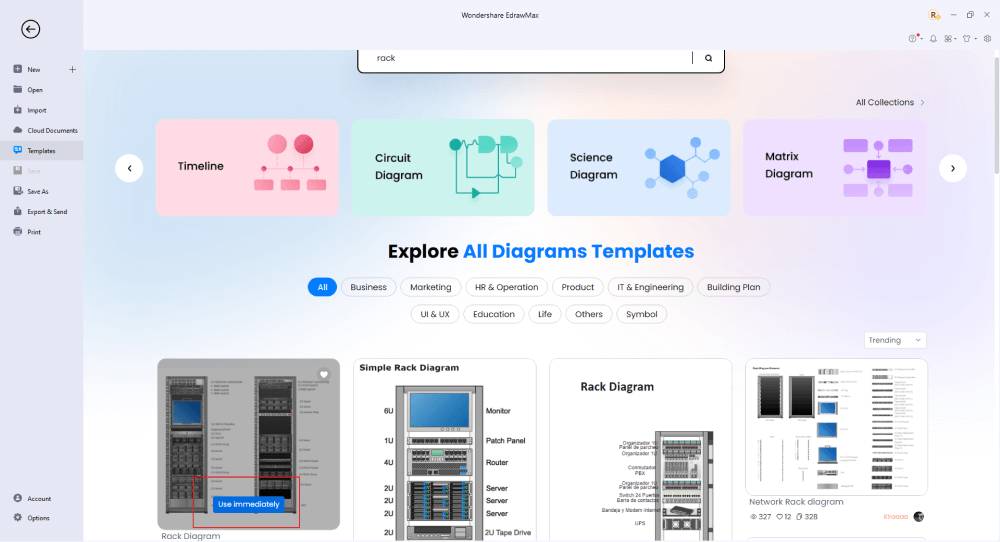
Step 2 Select a Template
After launching the software, the Home screen opens by default. Navigate to the Template bar and search for "Network Diagrams." Pre-built templates will appear on your screen. EdrawMax features a large library of templates created by over 25 million registered users in our Templates Community. Choose a template you like and click "Use Immediately" to open it in a new window for customization.
Step 3 Create From Scratch
From the EdrawMax homepage, you can click the '+' sign to go to a new canvas and start designing your rack diagram from scratch. You can use a wide range of symbols to create a detailed rack diagram, combining them with your own expertise.

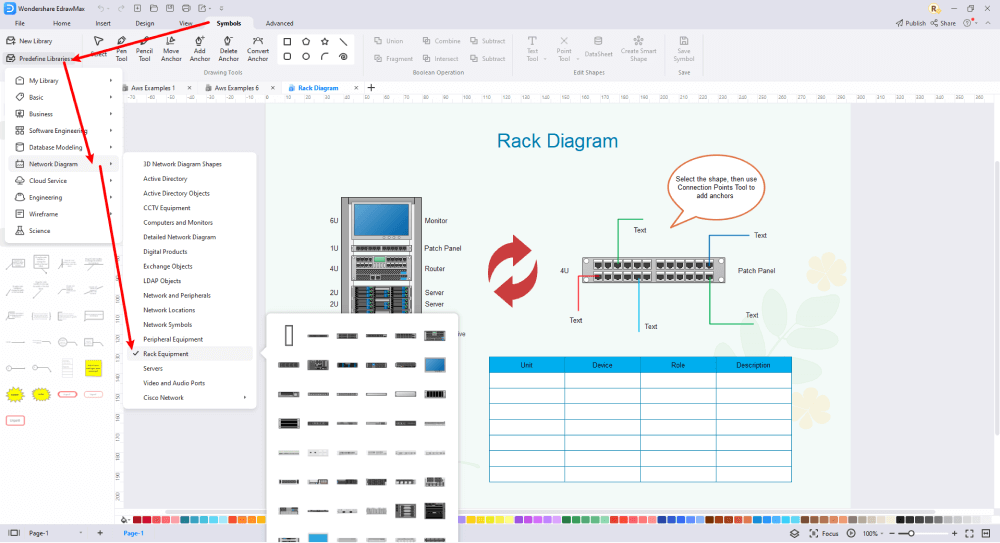
Step 4 Select Symbols
EdrawMax includes a vast number of symbol libraries. With over 26,000 vector-enabled symbols, you can quickly build any type of diagram. If you can't find the symbols you need, you can easily import images or create your own shape and save it as a symbol for future use. Simply go to the 'Symbols' section and select 'Predefined Symbol' from the top toolbar to access hundreds of symbol categories for your rack diagram.
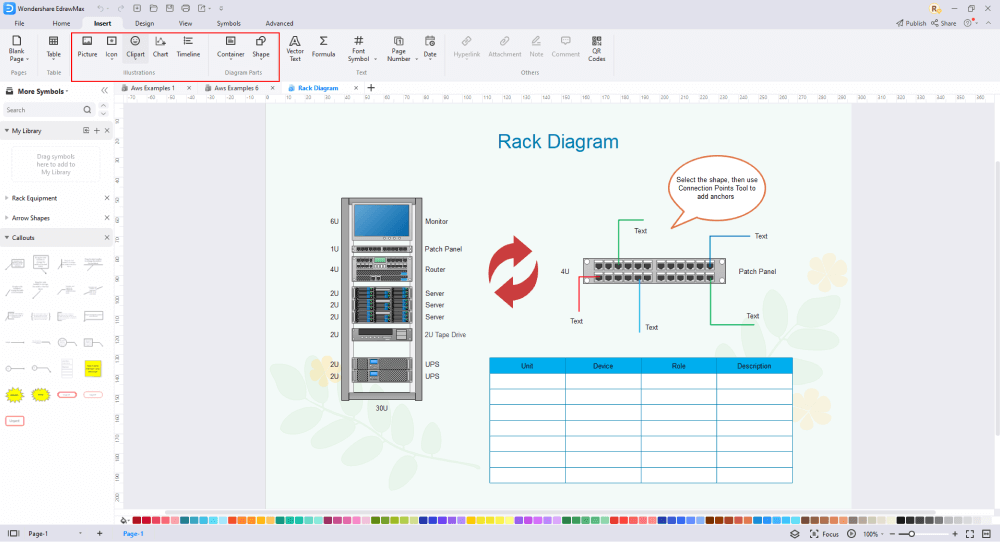
Step 5 Add Components
Once you've sketched out the basic layout, you can customize fonts, colors, and other details using the right or top menus to make your rack design more visually appealing. Feel free to draw inspiration from layouts in the Templates Community and incorporate elements or features you like into your rack design.
Step 6 Wrap It Up
After completing your rack design, you can get feedback from your workgroup using our Cloud-based files. Everyone gets free 100MB of cloud storage. EdrawMax supports exporting your diagram into various formats, including graphics, Microsoft Office files, HTML, PDF, Visio, and more. You can also share it via social media or email, print it, or present it to others using "Presentation Mode."

It's simple to create a rack diagram in EdrawMax; just grab a template and start customizing. You can drag and drop professional rack diagram symbols to enhance your plan. If you're still unsure how to get started, you can find more tutorial videos on our YouTube channel.
4. Rack Diagram Examples
There are three popular rack diagram templates available in EdrawMax. Simply log in to your account and search for these templates. Double-click on your preferred template and customize it as you like. Some of the rack diagram examples available in EdrawMax include:
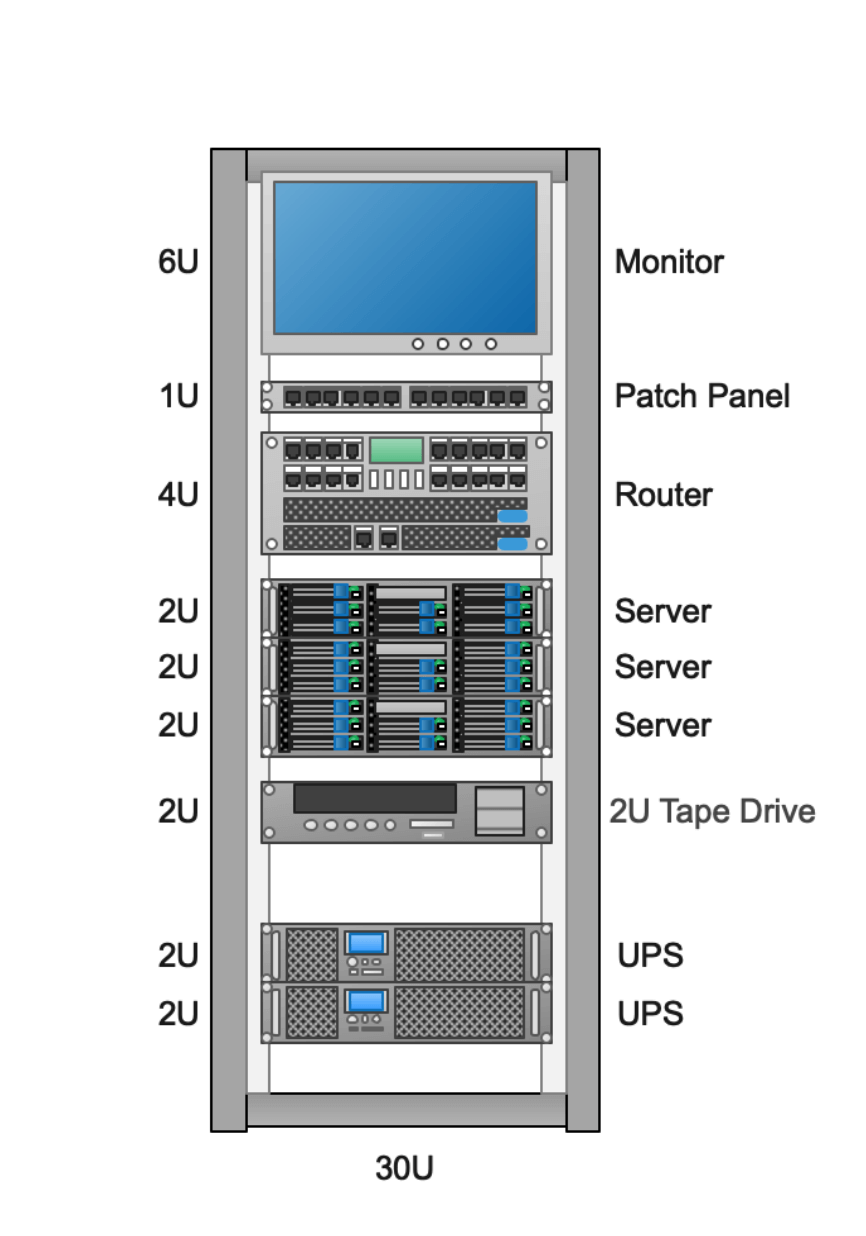
Example 1: Server Rack Diagram
This is an example of a simple server rack diagram. As shown, you can see all the items included in the rack, such as a monitor, patch panel, and server. This diagram is especially helpful for beginners who are new to creating rack diagrams. It is easy to understand and can be customized by changing labels, adding symbols, and adjusting icons or items to match your specific requirements.
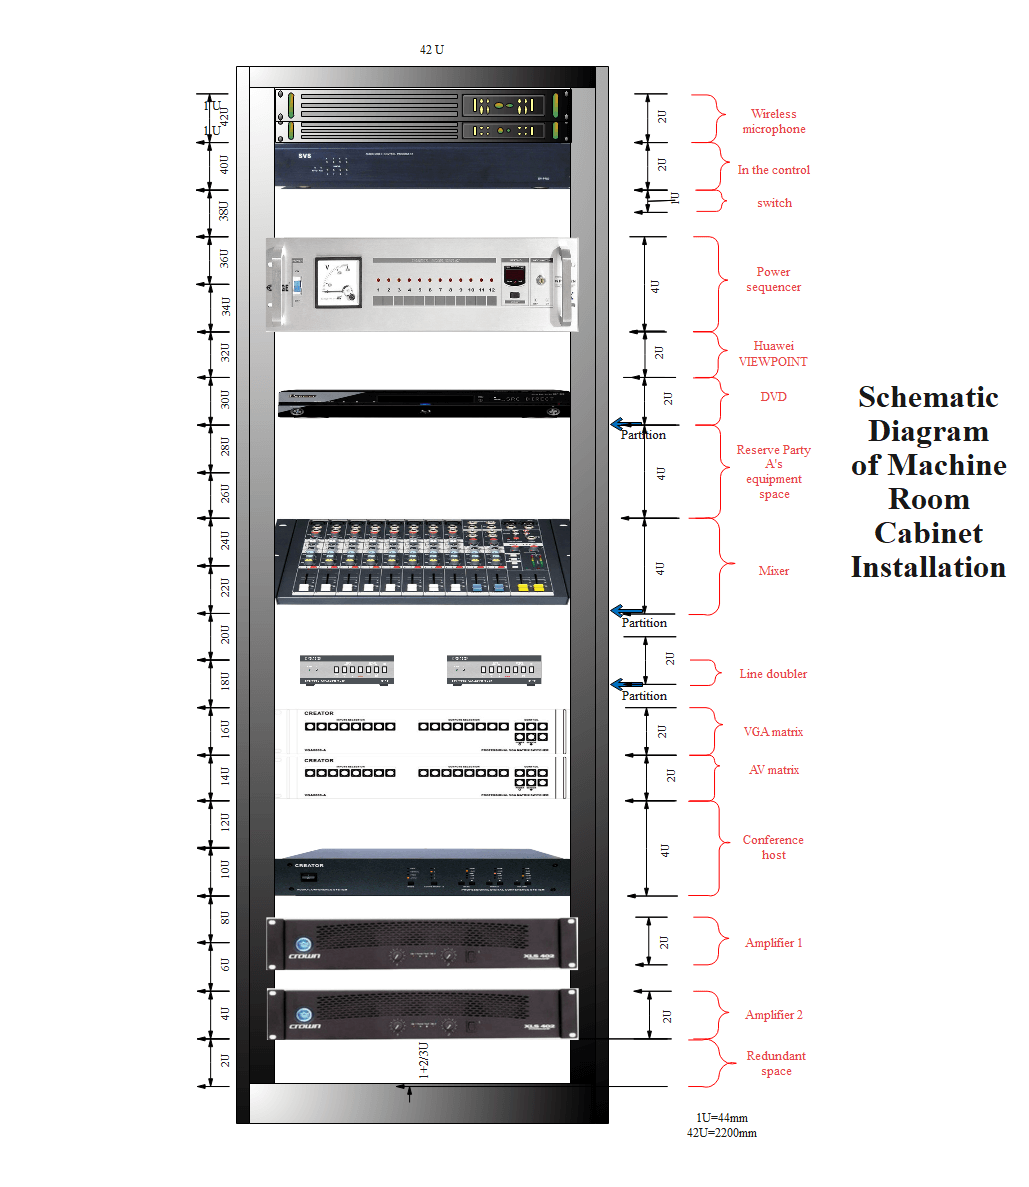
Example 2: Rack Elevation Diagram
Here is a 42U audio and video rack elevation diagram. It includes equipment like a power amplifier, mixer, and more. Use this template for an audio and video rack. The installation interface includes a VGA matrix, AV matrix, DVD player, power sequencer, switch, central control unit, wireless microphone, line multiplier, conference host, and power amplifiers 1 and 2. You can adjust the labels, symbols, and measurements accordingly.
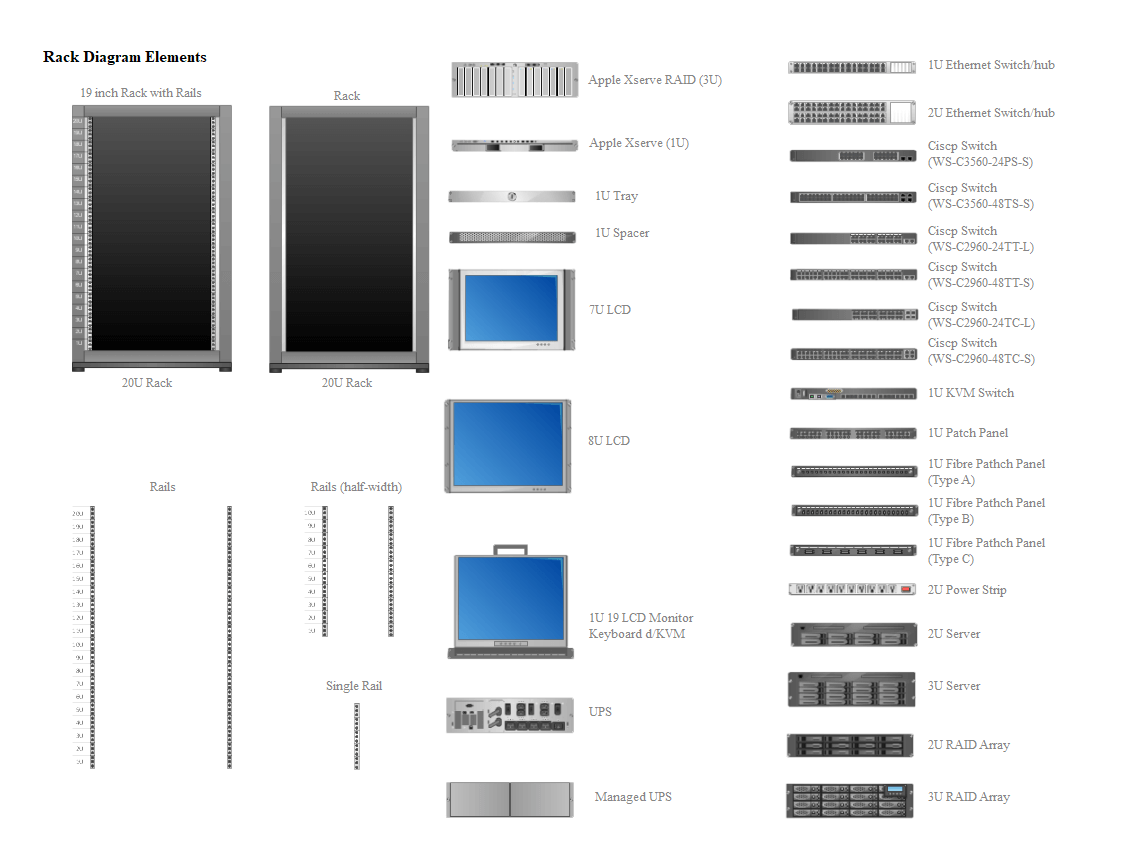
Example 3: Rack Layout Diagram
This rack layout diagram can be used to manage and track data center assets. The template includes various items that you can drag and drop onto the racks. The example shows two racks, including a 19-inch rack with rails, along with monitors, servers, a switch, power strip, Ethernet switch, Apple Xserve RAID, UPS, and more. Users can change the labels and insert the items on the racks to match their specific system.
5. Free Rack Diagram Software
Drawing a rack diagram by hand is a complex and time-consuming task, and many online tools can be difficult to use. You might miss vital details or make too many errors. That's why we recommend using EdrawMax, a professional and user-friendly software that simplifies the process.
EdrawMax is an all-inclusive diagramming tool you can use to create not only rack diagrams but also over 280 other types of graphical illustrations. With a wide range of rack symbols, fonts, and more, creating server rack representations is as simple as possible. Plus, users can easily customize diagrams and save their work in multiple formats.
Key EdrawMax Features for Your Rack Diagram:
- EdrawMax rack diagram software is compatible with Windows, Linux, and Mac devices, allowing you to access diagrams online from anywhere at any time.
- Create over 280 types of diagrams, including flowcharts, tree diagrams, mind maps, architectural diagrams, wiring plans, and more.
- Export your work in a wide range of formats, such as HTML, document formats like PowerPoint, Word, and PDF, and image formats like PNG and JPEG.
- EdrawMax has a huge library of customizable templates to help you get started quickly and efficiently.
You May Also Like
Human Anatomy Complete Guide
Article
What is Mesh Topology
Article


